Hello everyone, we are now going through some videos that go over rendering and texturing in Maya. We are starting near the end of one of Digital Tutor's tutorials called, "Product Visualization in Maya." We used the tutorial's files for practice. Here is what we went over.
First we built a simple backdrop using the CV curve and a loft.
The next lesson went over working with lighting in our scene. I never thought on how important lighting was in a scene until now. It can make things look incredibly better. (Two Lights).
In addition to this, here is also what it looks like with final gather and turning the lighting intensity levels a bit lower.
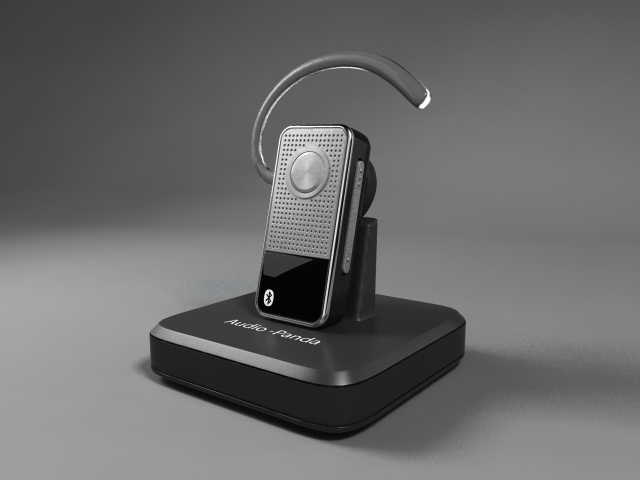
In the next lesson we started creating a plastic material for the casing. The material that we are using in in the mental ray section of the hypershade and is called mia_material_x.
In the following tutorial we went over a little bit about created a brushed metal texture and what some of the tools/options for the materials did.
After that we went through creating 3 more materials for sections of our headset. First we made a new mia_material_x for our earbud piece. We changed it to a rubber preset which was already made. Maya's mia_material_x for 2013 has a lot of useful presets.
Continuing we assigned another mmx (mia_material_x) to the headset's rim. We used the chrome preset and just left it at its default settings.
Finally we used another mmx material on the lower square geometry. We left it at its default besides changing its color to black (giving it the appearance of shiny plastic).
In the next lesson we went over creating a blurry plastic material for the headset's charging base. We also put a frosted glass texture on the ear hook. It is amazing how much the frosted glass preset on the mmx actually looks like real glass!
Here is the same texture just different angle. The color of the transparency is dependent upon the angle of the render and what it's background is.
Next we worked on creating a custom anisotropic pattern on the front button. The key to do this was to use to combine a mmx texture and a ramp texture together (make it radial).
In the next lesson we added some logos to our mental ray materials using a uv_snapshot and photoshop.
We moved on to the microphone speaker next. We used a cloth texture on a circular plane combined with a plain lambert.
In the same lesson we took a black plane and placed it underneath the metal grating. It is a very subtle difference in shadowing in the holes.
In the following tutorial we started working on the LED light. This is really cool too! We messed around with connecting a blin material and a bulge material and connected it in various ways using the hypershade. Here are a few renders showing some of changes.
Finally we messed around with the render settings and put the settings at the highest quality. Here are the some of the final renders.
These rendering tutorials were really cool, I hope to use what I learned in future personal projects. Follow along soon too see the next set of tutorials I go over.
I decided to try and do a quadruped run using a wolf model. Everyone told me that it looked like Balto, but I haven't seen the movie that they were referring to haha.
Here are the 3 Playblasts and and the final rendered video. I know it needs some work, so I might go back to it in the future.
Here is also the video I used for reference.
Lastly, here is the rendered version of the wolf running. I would like to smooth the animation out some with the graph editor when I have the time.
Okay, so first I picked a portion of the video I wanted to do. I tried to see if I could emulate the 15-17 second portion of the march and will try to see if I can cycle it. Here is a picture of the initial pose that I put my robot in.
I have now blocked out the first pass of my animation. Here is what it looks like so far. I will try to tweak it as I go along and get feedback from other people.
Okay, so I just spent about another 2 hours on it and I am starting to get it to look more like the march in the video. Match the timing of the march in the video is probably the hardest. I still need to fix the leg slide. I will try to figure it out. But here are the differences that I made. I wish I knew how to use the graph editor more; it seems useful.
Once I started looking at the animation along with the video with my friend Chris, I realized that there was much that I had to fix. I spent another 4 hours today on it. Here is where it is at for the moment. It it getting more accurate to the video, but he seems to be marching really really fast. I need to fix that.
Here is the current condition of my march. I know its not perfect, but I feel like I was getting a better feel of the march at the end. If I have more time I will try to perfect it later. Here are 3 Playblasts and the final render.
I have know moved on from rigging a quadruped to creating a standard walk cycle. If you are interested I am following along in Digital Tutors, "Creating Walk Cycles in Maya". Here is what I have so far.
I have finished the contact poses and am moving on. This is the result of lesson's 1-4.
The next tutorial tweaked the characters feet and adjusted some key frames. Here is a video showing a little bit of tweaking done to the feet, having the body come down a little and adjusting the speed of the key frames in order to also show weight.
In the following video Delano (Digital Tutors' instructor), showed that you should check the extremes using your graph editor. The curves of your animation should never be to flat or at the same level. A motion should have it's highs and lows. Here is a screen capture that shows my settings when I was using the graph editor to adjust curves and also shows using Playblast to check how your animation looks outside of Maya.
From this point onward it seems like animation is a big refining process. You block out the steps of your animation and then little by little continue to tweak it to look the way you want it to. Here is a video showing part of the refining process involved when try to improve pieces of your animation. I used the graph editor to start refining the upper body and feet of the character.
The next thing to be refined was the balance of the character. When you look at the character walking from the front view it looks alright, but it can tweaked to look better. This next video shows the refinements made from the last video. The purpose was to make the walk more realistic and so I added some swaying to the side the character's leg was balancing on.
In the last video the character's footsteps were facing directly forward, which isn't natural. So now I added in some rotation keys to the foot steps so that the steps look more natural. I can also start to see that after awhile one needs to get used to using the graph editor because it is an important tool.
The next video went over giving the toes a flap when the character walked. This added some exaggeration to the animation and yet made it look more realistic. Here is a video showing how your walk cycle can look more realistic when you add a toe flap to it. I used the graph editor and the special toe flap custom options that were already in the layer editor of this pre-made character.
The next video went over adding some extra weight to the hips to help sell the walk. I used a screencapture to show you the subtle difference of your animation when you add weight to the hips.
In the following tutorial we added rotations to the character's walk to show his possible attitude/swagger. Here's a video showing this.
The next tutorial went over adjusting the chest to move along with the walk of the character. Here is a screen capture showing this modification.
After adjusting the chest we moved on to giving the head some animation too. Here is a video showing how animating the head to bob along with the character can help show the character's attitude and bring realism to your animation.
The next tutorial was devoted to correcting the motion of the upper arm. Using the graph editor, weighted tangents, free tangent weight, and the layer editor we were able to correct the motion of the upper arms. The arms were moving a little too slowly before and so we made the arms swing faster. Here is a screen capture demonstrating this.
In the following tutorial we worked on the arm swing of the character. Here is a video that shows how adding swinging to the arms can help improve the walk cycle animation.
The next tutorial went over working with the elbows. Here is a screen capture showing the follow-through and overlapping action of the elbows. When you make an animation you need to make sure that the rest of the body is reacting naturally to the movement of the character.
After working on the elbows of the character we moved on to the wrists. Delano mentioned that if you study a human walk there is indeed some wrist flap that accompanies it. Here is a video showing how adding a wrist flap to your character's walk cycle can help sell how realistic it looks.
The next video tutorial was pretty short and just added in some wrist rotations. Here is a screen capture showing the subtle changes in the rotation of the wrists. Attention to detail is very important in animation even if it's small.
The following lesson went over refining the shoulder movement, but I couldn't tell the difference once I changed things. Here is a video showing the shoulders. Can you see a difference? Things keep on changing with my setting too whenever I log back into my computer. Before, I couldn't get lots of my settings in the graph editor to work. When I logged in this last time on the same computer, everything worked again, but the grid in Maya turned gray and looked like a solid plane. I also can't see the recurring dotted lines in the graph editor anymore, weird.
The next lesson showed a way to translate your walk cycle forward. Here is an example of the character moving forward once you complete a few steps. I tried to show most if not all the steps that were needed to move the character forward.
After translating the walk cycle forward we moved on to creating an animation layer. Animation layers are cool because you can store different animations in them and turn them on and off at will (handy right?). This video shows how using a simple head turn and making it into an animation layer can help bring further life to your animation.
Finally, the last video went over creating custom attributes. Here is my final screen capture showing how useful making a custom attribute can be. In this case we made a smooth attribute.
Yes! One walk cycle down and one to go! =D
Here are 3 Playblasts from different perspectives and also the rendered version.


intensity_lower.jpg)